So this tutorial is about making your Android game using Game Maker Studio.
Basically, I’m going to show you how to do the setup to make the the APK file, how to install the Google Play service.
When I first started making games with GMS, I found no detailed, step by step instructions about this. So, I had to figure out how to do it myself. :D
I decided to make this tutorial so that you can save yourself a lot of time from doing trial and error.
Wanna study some source code for inspiration ? Check out :
The Art of Screenshake + Source Code ( Vlambeer)
Super Crate Box Source Code from Vlambeer
The tutorial has 3 parts
- How to set up GMS to make APK file
- How to install Google Play Service
- Test the Google Play Service
Part 1 : Create APK file
I assume that you have your Game Maker Studio installed and run smoothly :DIt’s quite simple to do. All you have to do is to install the following package:
a. JDK ( Java Development Tookit )
You should install this before SDKSimple, follow this link to download the exe file and install it.
http://www.oracle.com/technetwork/java/javase/downloads/jdk8-downloads-2133151.html
Here's the latest result at the time of this post :
Windows 32 bit
http://download.oracle.com/otn-pub/java/jdk/8u144-b01/090f390dda5b47b9b721c7dfaa008135/jdk-8u144-windows-i586.exe
Windows 64 bit
http://download.oracle.com/otn-pub/java/jdk/8u144-b01/090f390dda5b47b9b721c7dfaa008135/jdk-8u144-windows-x64.exe
b. Android SDK
The Android SDK is a little bit tricky to install.*Note* : Please STAY AWAY from the ADT Bundle because it will drive you crazy trying to figure out what to do. Not to mention that it only has the latest version of SDK which isn't good enough to create APK file
Here're the steps you should do
- Go to “ Download for other platforms”
- Look for “SDK Tools only”, and get the “installer_r22.6-windows.exe” file. That’s the file we need.
- Run the installer, it will ask you to install the Android SDK to the path "C:\Program Files (x86)\Android\android-sdk".
- However, you should install it to other path ( like D:\Android\android-sdk ), because the default path can cause errors with GMS.
- Once you installed the SDK successfully, start the SDK Manager and select the following API ( along the most recent version of Android )
- Android SDK Platform Tools
- Android 2.1 (API 7)
- Android 2.2 (API 8)
- Android 3.2 (API 13)
- Android 4.0.3 (API 15)
c. NDK
I don’t know much about the NDK,it seems not as important as the SDK and NDK, but just install it anywayhttps://developer.android.com/tools/sdk/ndk/index.html
==> Installation : Completed
OK, now we have all the files needed to create APK, we need to do one more step : Create a keystore ( aka SHA1 key ).
Create a keystore
When adding the linked app to Google Play, it requires a string called signing certificate fingerprint ( SHA1). It's important if you want to use Google Play Service ( like Leaderboard or Achievements ).OK, now here's what to do .
Go to File>Preferences>Android, you can see the first three sections should have been filled in automatically by Game Maker:Studio (if not, you can navigate to the destination folder manually ).
 | |
|
OK, now go to the “Keystore” tab on the left side.
The KeyStore is a file that will be used to "sign" all your Android apps so please fill in all the details correctly.
- Filename - this is the name of the KeyStore file (note : Not your name or the company name !)\
- Password - your security password for the KeyStore file which must be at least six characters long
- Alias - this is another name that can be used for the KeyStore file and should be different to the above name
- Password - the password for the alias file. Should be the same as the Name password
- Common Name - this would normally be your name
- Organisational Unit - the department within the company that you are in
- Organisation - the name of your company
- Location - the name of the town or city where you are based
- Country - the two letter code for the country where you are based
Note that all names must have only letters, numbers and spaces but no special characters.
 |
| Game Maker Studio - Preferences - Android : Keystore |
Once this information is filled in and you are happy with it, press the button marked "Generate" for GameMaker:Studio to create the necessary KeyStore file.
This may take a moment but once it is finished, you will see that the section marked Private KeyStore File will have been updated to reflect the new name that you have given it.
Once this is done it normally will not need to be changed again.
Please back up your keystore file somewhere safe and make sure to remember your details. You can find the generated keystore at %localappdata%\GameMaker-Studio\keystore.keystore.
If you lose your keystore or forget the details you may not be able to perform updates on android apps that have already been published.
Note
- Any changes to any field could affect the keystore file.
- Please pay attention, if you want to create a new keystore file, change the information and press “Generate” to create a new file. However, you should first close the GMS, restart it and press “Generate” again to clear all the cache of the old keystore file.
There’s a detailed instruction here on YoyoGames
http://help.yoyogames.com/entries/23363366
Oh Yeah, till now, you can create an nice APK file, but before that, go to Global Game Settings -> Android -> General tab and make some small adjustments.
Update the following info for your game. Here's an example from my game " Match a Shape"
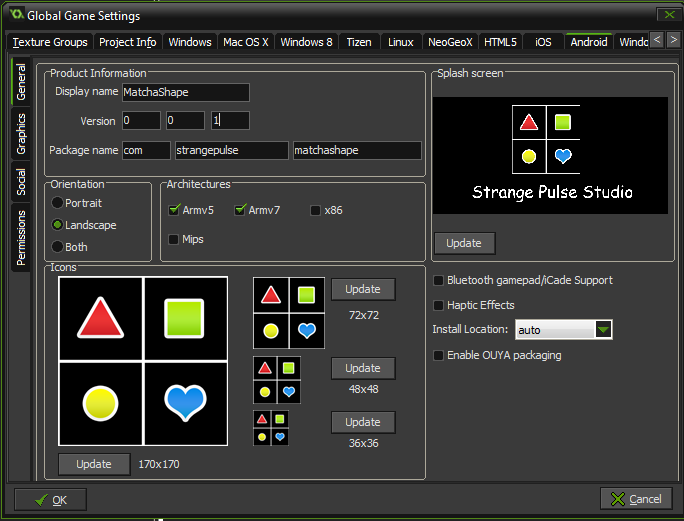 |
| Global Game Settings : Android |
a. Product Information
- Display Name : the name of your game ( don’t worry, you can change it later )
- Version : set the version to 0.0.1 is a good habit. Because in Google Play, once you decide to upload another APK file, it should have the version greater than the previous one. If you set the version to 1.0.0 as default in testing mode, when you want to publish the game, the version should be changed to 1.0.x, which doesn’t look so nice.
- Package name : the “companyname” is your studio name ( no space ), the last one is the name of your game ( no space ).
b. Architecture
Check the ARMv5 and ARMv7 ( some could tell you to check the x86 to support Intel chipset, it’s OK as long as you use an Android emulator like Bluestack, if not, uncheck it ).The Mips is for some Chinese tablets, you don’t need them.
Remember, the less architectures, the less size the APK will be.
Normally, I check only the ARMv5 and ARMv7
.
The rest is left as default, you may want to change it after finishing your game.
Now you're ready to create your APK file.
Enjoy.
i googled a lot to get a proper tutorial about this...but couldnt get any...anyway thankx for posting this i wil defenetly give it a try
ReplyDeleteThank you ! I struggled a lot to make my first game on Google Play, so I made this tutorial so that you guys can save a lot of time ( and headache ) :D
ReplyDeleteThank you very much
Deletethanks, nice post
ReplyDeleteIt has helped me.But,I can't create the APK after I have generated the key.I am trying to create and it returns the error "Signing key Ethio not found." Can you help me how to fix
ReplyDeleteHi Petros
ReplyDeleteHave you fixed the problem ?
I haven't had that error before, so the only thing I can tell you is follow exactly what I wrote.
Make sure you use the latest version of Game Maker Studio.
Sometimes the error is fixed if you restart the computer and run the compiler again.
Or you have to create a fresh keystore and try the compiler again.
Regards,
Solo se puede habilitar la parte de android comprando la licencia?
ReplyDelete